.png)

Set up the JTAG and Serial Port on the ZC702
- Zach Pfeffer

- May 2, 2019
- 1 min read
Updated: May 14, 2023

This post shows you how to connect the JTAG and serial port of the ZC702, where to get the USB-to-serial port driver and how to configure the SDK to see the serial port output.
Versions Used
SDK 2018.2
ZC702 Rev 1.1
Windows 7 SP1
Set up the ZC702
Step 1: Set SW16 to JTAG mode [mode documentation see p.16]

For the rest of the jumpers see the high-resolution photo of the board in the correct state at [link].
Step 2: Connect a Micro-B to Type-A (host connection) USB cable from U23 (Diglent USB JTAG interface) to the host PC
U23:

Micro-B connector:

Type-A connector:

Step 3: Connect a Mini-B to Type-A (host connection) USB cable from J17 (CP2103GM USB-to_UART Bridge) to the host PC.
J17:

Mini-B connector:

Type-A connector:

Part II: Set up the Terminal
Step 1: Install the Silicon Labs CP210x USB to UART Bridge VCP Drivers
A. Goto [link]
B. Download and unzip the correct installer
C. Install the driver (I did not need to restart on Windows 7 SP1)
D. Click Windows
E. Click Devices and Printers

F. You should see Silicon Labs CP210x USB to UART Bridge
G. Note the COM port (you'll need this later)

Step 2:
A. Click Window
B. Click Show View
C. Click Other

Step 3:
A. Expand Terminal
B. Click Terminal
C. Click OK

Step 4: Click Settings

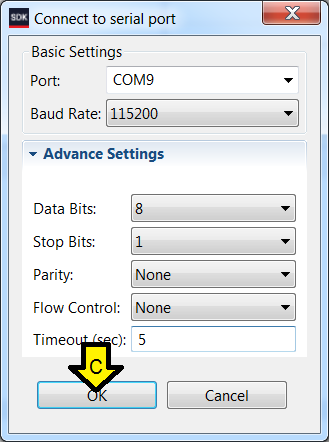
Step 5:
A. Use the COM port listed in Devices and Printers
B. Click OK

Step 6: Turn on the board

Part III: Switch Between Run and Debug View, Set Up Debug View
Step 1: Click to disconnect Run terminal (if you're connected in Run mode)

Step 2: Enter Debugging in the SDK
Step 3: Connect the serial port
A. Click SDK Terminal
B. Click the '+' (Connect to serial port.)

C. Use these settings and click OK
References
Xilinx logo found via https://twitter.com/xilinxinc at [link]