
FSBL Creation and Source Debug in Xilinx Vitis 2019.2
![]()
This post demonstrates how to create and debug a ZCU102 FSBL and FSBL BSP using Xilinx’s 2019.2 Vitis, previously known as the Xilinx SDK.
Create an FSBL
#1 Run Vitis IDE 2019.2
#2 Set Workspace: to /home/demo/demobspdebug and click Launch
#3 Click the x to close the Welcome screen:

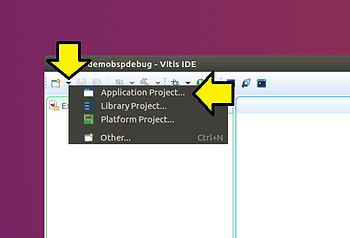
#4 Create an Application Project…
#5 Use debugfsblbsp for Project name: , accept defaults, and click Next >

#6 Click on the Create a new platform from hardware (XSA), select zcu102, click Next >

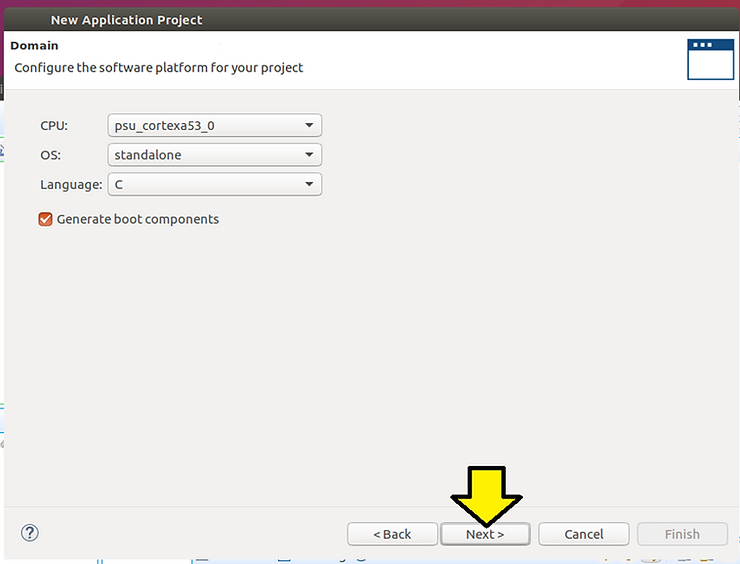
#7 Click Next >
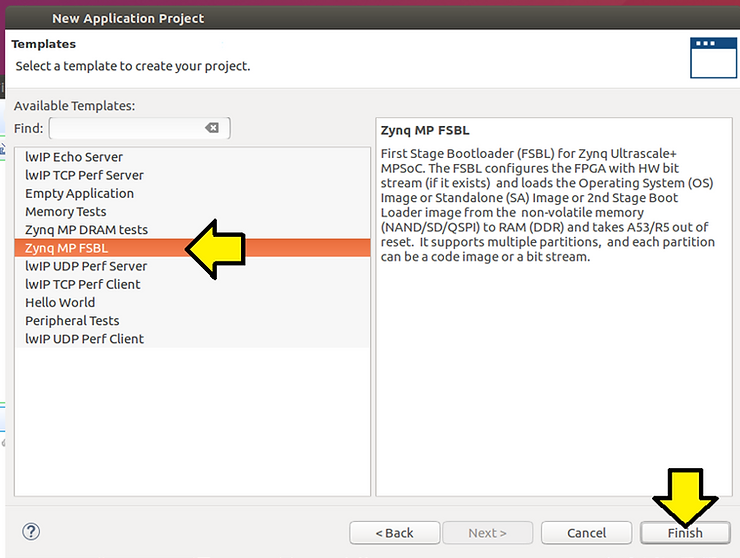
#8 Select Zynq MP FSBL and click Finish
Note: we have two FSBLs:
What we’re working on:
/home/demo/demobspdebug/debugfsblbsp/src
Part of the “platform” which we don’t use:
/home/demo/demobspdebug/zcu102/zynqmp_fsbl
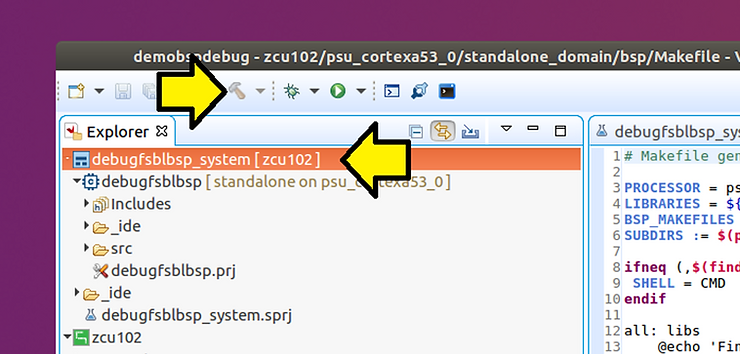
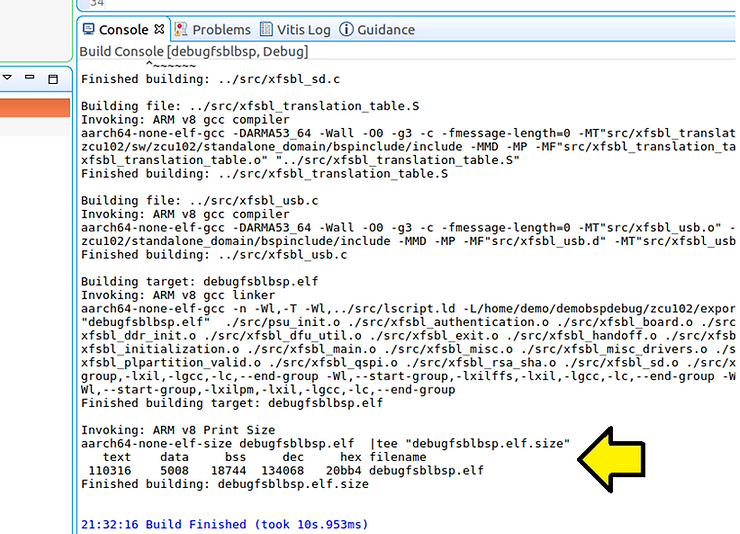
#9 Build the FSBL “app” and BSP. Click on debugfsblbsp_system [zcu102] and click the hammer icon to build
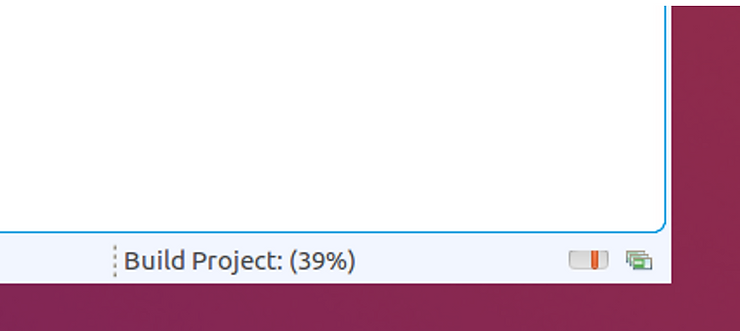
Note: High-level progress is listed in the bottom left corner of the GUI:
Note 2:
You can switch between consoles here:

CDT Global Build Console
Contains all the build output
Output from this post: https://drive.google.com/file/d/1WnPVOeIhAaxuCrj3brqT8edOs-mjoedL/view?usp=sharing
Platform Tcl Console
Contains the TCL commands used to create the platform(s)
Output from this post: https://drive.google.com/file/d/1WqDV2ScxiYO3Xl6wfav4vJCh1ni3LBQ9/view?usp=sharing
Build Console [debugfsblbsp_system, Debug]
Contains “system” level commands, in this case the command that creates a BOOT.BIN using a BIF
Output from this post: https://drive.google.com/file/d/1WqOUhMh3pG2m1p0hdJJ5rUBMFNqZZZJz/view?usp=sharing
Build Console [debugfsblbsp, Debug]
Contains the build output from the FSBL we’re building (not the one under zcu102)
Output from this post: https://drive.google.com/file/d/1WsBNmWF0FhChRt_xszzC6VxOKyfriwk4/view?usp=sharing
Build Console [zcu102]
Contains the build output from the BSP build.
Output from the post: https://drive.google.com/file/d/1X-qXkF3p3iY45H90CGmLKs-3avCMHXrB/view?usp=sharing
Debug the Created FSBL
#1 Test. Right-click on debugfsblbsp, hover over Debug As, and click Launch on Hardware (System Project Debug)

You should see:
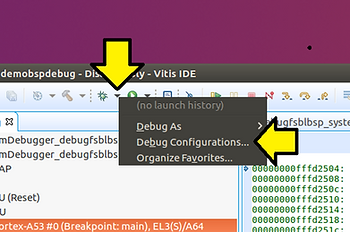
#2 Update the debug configuration to point to the FSBL we’re working on. Click the down arrow by the bug icon and select Debug Configurations…
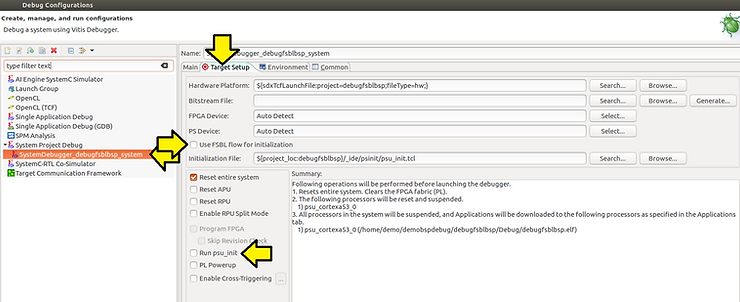
#3 Expand System Project Debug, click on SystemDebugger_debugfsblbsp_system, click on Target Setup, deselect Run psu_init, and deselect Use FSBL flow for initialization.
#4 Click Apply and click Debug
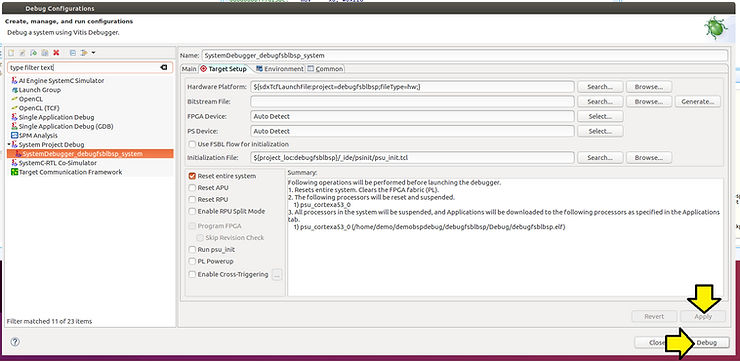
Note: changing the Target Setup is needed because running the FSBL twice, runs the psu_init twice, which causes problems. psu_init is a bunch of generated code that actually “connects” the Vivado output to the embedded platform output.
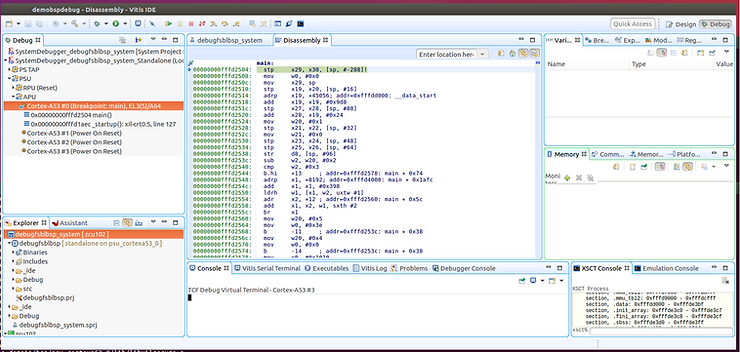
You should see the FSBL we’re debugging downloaded:

#5 Look at the console output. Type:
screen /dev/ttyUSB0 115200
Note:
Ctrl-a d to detach screen -r to reattach:
You should see:
Xilinx Zynq MP First Stage Boot Loader
Release 2019.2   Dec  3 2021  - 15:41:27
PMU-FW is not running, certain applications may not be supported.
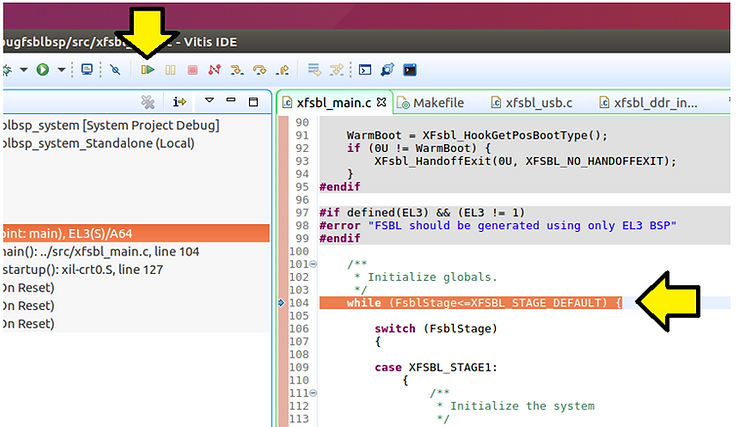
(A) Click Design, (B) click xfsbl_main.c, (C) Add a “My” to the string, (D) click build, and (E) click debug

You should see the following on your terminal:
My Xilinx Zynq MP First Stage Boot Loader
Release 2019.2   Dec  3 2021  - 16:46:24
PMU-FW is not running, certain applications may not be supported.
Enable FSBL Debug Symbols (and Fix Error)
#1 Enable debug symbols in the FSBL.
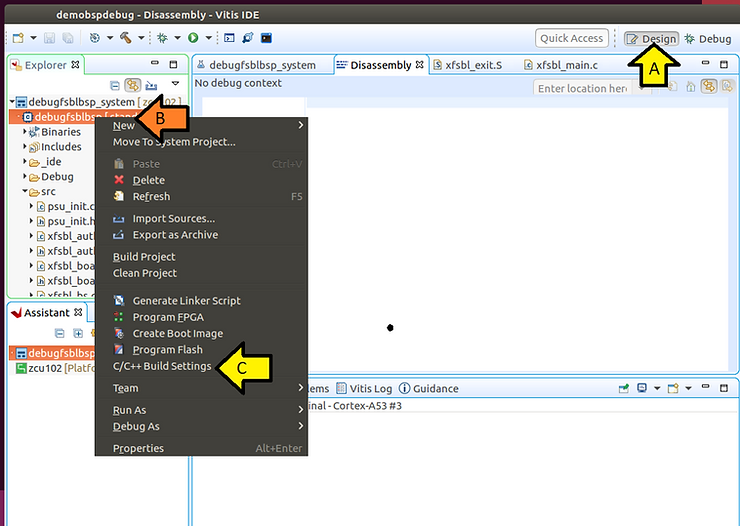
(A) Click Design, (B) right-click on debugfsblbsp [standalone on psu_cortexa53_0], (C) click C/C++ Build Settings
#2 Click C/C++ Build > Settings and click Miscellaneous
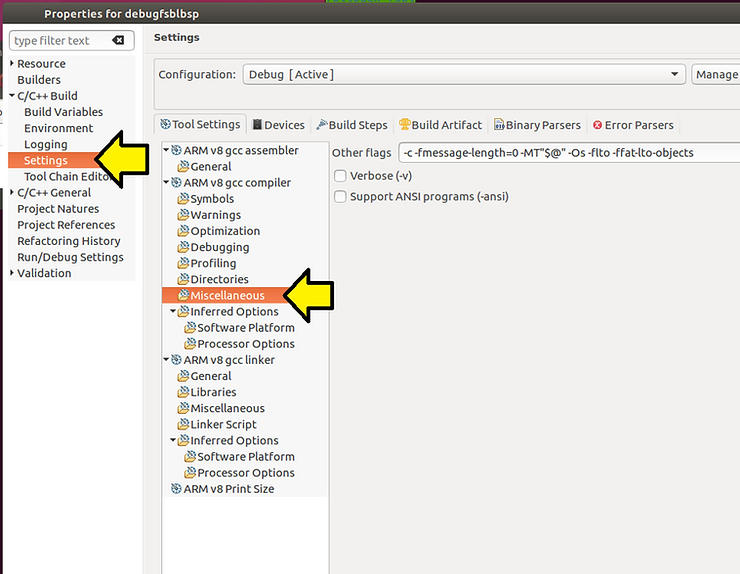
#3 Change:
-Os -flto -ffat-lto-objects
to
-O1
…and click Apply
…and click Apply and Close

You’ll see errors:
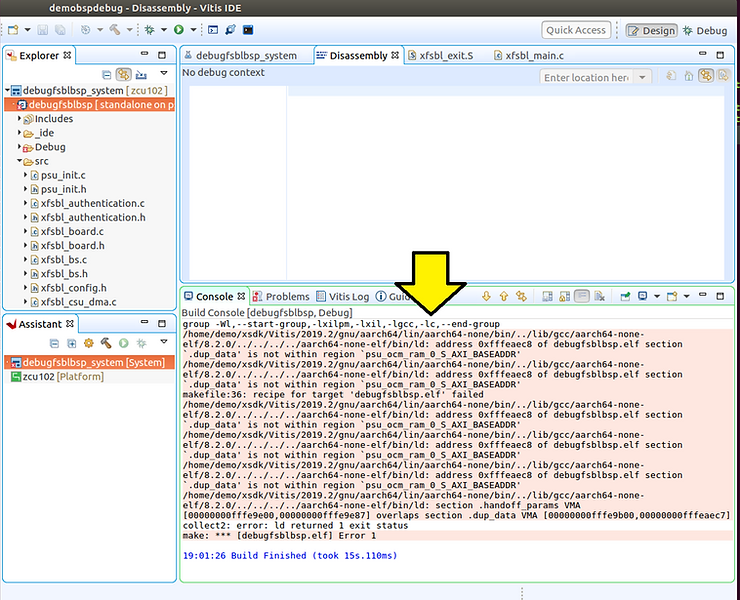
Console output from this post: https://drive.google.com/file/d/1XAjRiuaPisCuMg9tSzaRu66mgRulBLzj/view?usp=sharing
#4 Fix errors. (A) Open xfsbl_config.h and…
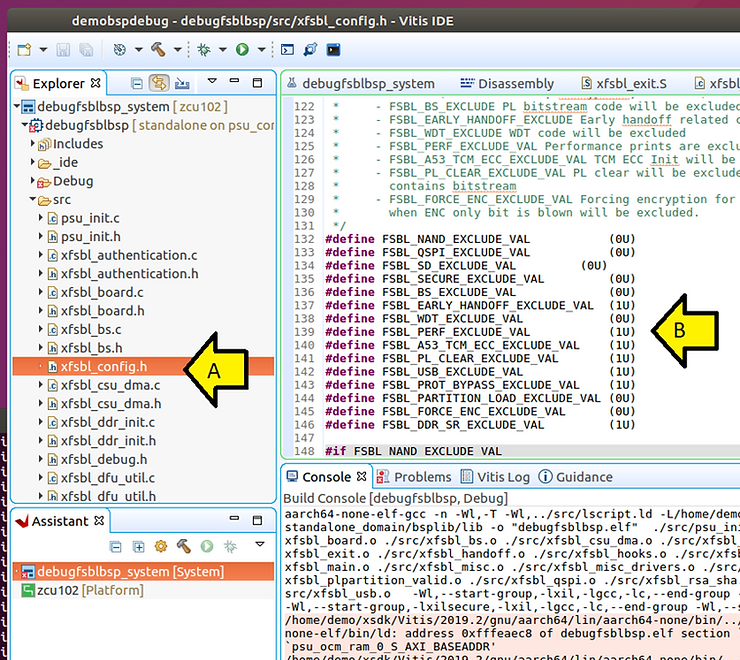
(B) set all of these from:
#define FSBL_NAND_EXCLUDE_VAL                             (0U)
#define FSBL_QSPI_EXCLUDE_VAL                             (0U)
#define FSBL_SD_EXCLUDE_VAL                               (0U)
#define FSBL_SECURE_EXCLUDE_VAL                           (0U)
#define FSBL_BS_EXCLUDE_VAL                               (0U)
#define FSBL_EARLY_HANDOFF_EXCLUDE_VAL                    (1U)
#define FSBL_WDT_EXCLUDE_VAL                              (0U)
#define FSBL_PERF_EXCLUDE_VAL                             (1U)
#define FSBL_A53_TCM_ECC_EXCLUDE_VAL                      (1U)
#define FSBL_PL_CLEAR_EXCLUDE_VAL                         (1U)
#define FSBL_USB_EXCLUDE_VAL                              (1U)
#define FSBL_PROT_BYPASS_EXCLUDE_VAL                      (1U)
#define FSBL_PARTITION_LOAD_EXCLUDE_VAL                   (0U)
#define FSBL_FORCE_ENC_EXCLUDE_VAL                        (0U)
#define FSBL_DDR_SR_EXCLUDE_VAL                           (1U)
…to (all 1U):
#define FSBL_NAND_EXCLUDE_VAL                             (1U)
#define FSBL_QSPI_EXCLUDE_VAL                             (1U)
#define FSBL_SD_EXCLUDE_VAL                               (1U)
#define FSBL_SECURE_EXCLUDE_VAL                           (1U)
#define FSBL_BS_EXCLUDE_VAL                               (1U)
#define FSBL_EARLY_HANDOFF_EXCLUDE_VAL                    (1U)
#define FSBL_WDT_EXCLUDE_VAL                              (1U)
#define FSBL_PERF_EXCLUDE_VAL                             (1U)
#define FSBL_A53_TCM_ECC_EXCLUDE_VAL                      (1U)
#define FSBL_PL_CLEAR_EXCLUDE_VAL                         (1U)
#define FSBL_USB_EXCLUDE_VAL                              (1U)
#define FSBL_PROT_BYPASS_EXCLUDE_VAL                      (1U)
#define FSBL_PARTITION_LOAD_EXCLUDE_VAL                   (1U)
#define FSBL_FORCE_ENC_EXCLUDE_VAL                        (1U)
#define FSBL_DDR_SR_EXCLUDE_VAL                           (1U)
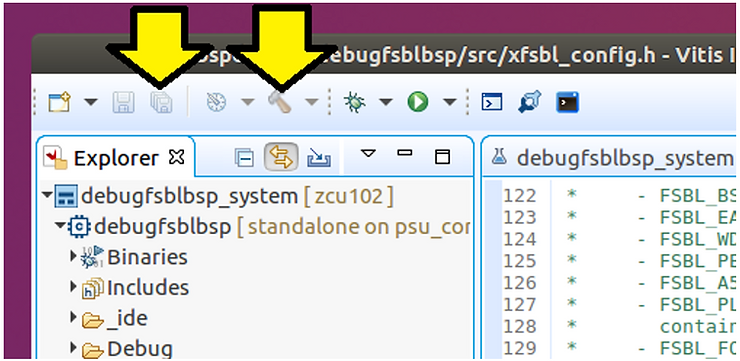
#5 Click Save All and click Build
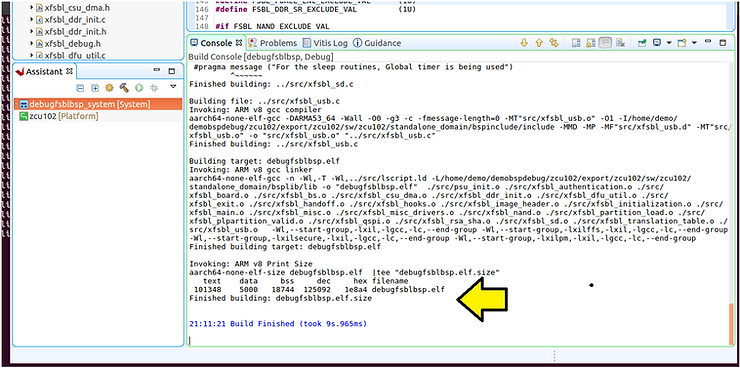
You should see:
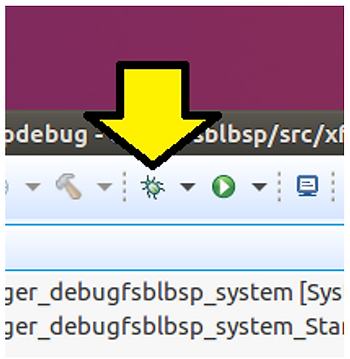
#6 Click Debug
You should see source-level debug working:
Enable Debug Symbols in the FSBL's BSP
#1 Enable symbols in the BSP
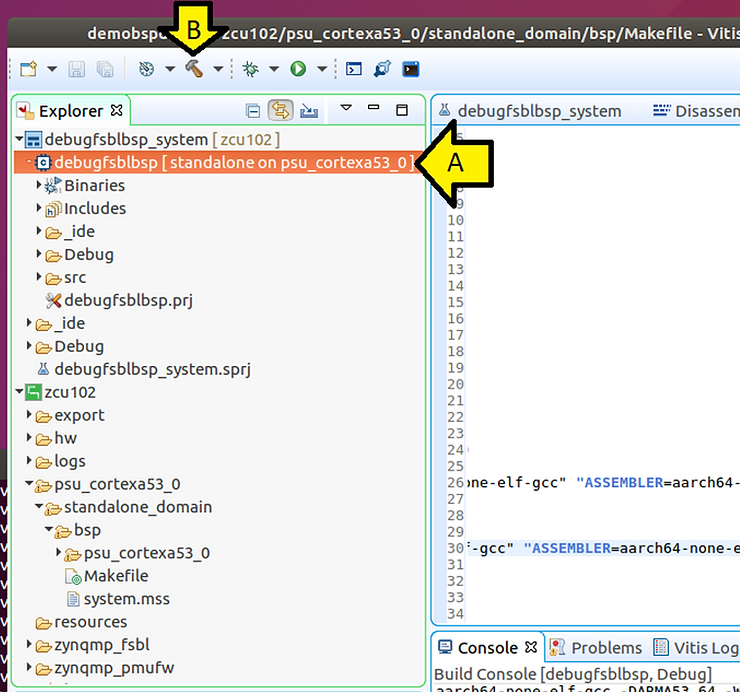
(A) Click Design
(B) Find and double-click the BSP’s Makefile
(C) Scroll over the editor
(D) Find:
-Os -flto -ffat-lto-objects
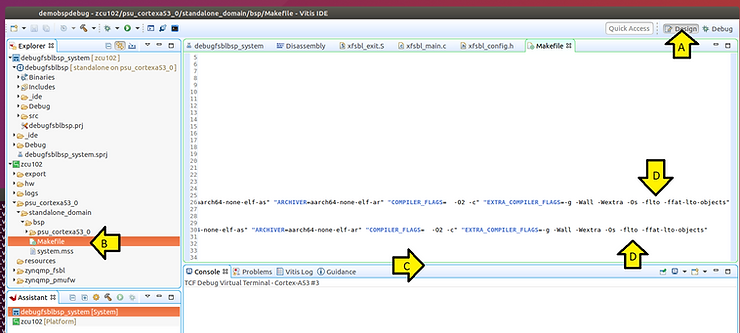
(A) Change:
-Os -flto -ffat-lto-objects
…to
-O1
(B) Click Save All
(C) Click Build

You should see the correct flags in the BSP Build Console
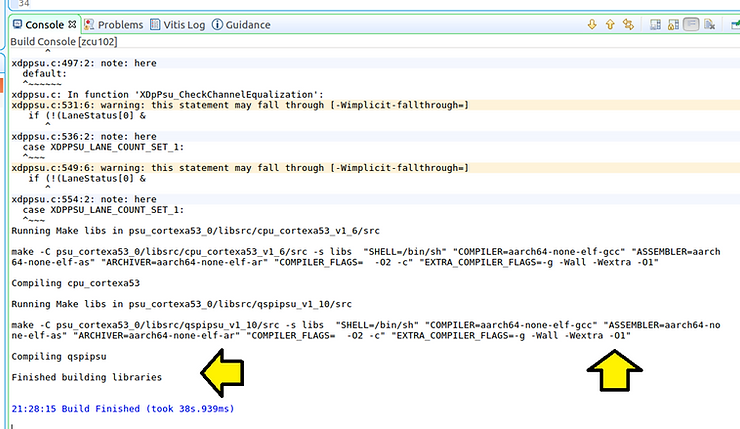
Console output from this post: https://drive.google.com/file/d/1XGBCsNNTmT9hi8VAV9sA-sOwiWbUWvDT/view?usp=sharing
#3 Rebuild the FSBL
(A) Click debugfsblbsp [standalone on psu_cortexa53_0]
(B) Click Build
You should see:
Console output from this post: https://drive.google.com/file/d/1XI7fGFNiOQ6WR4WNfO1Ys-uLe94lYIX1/view?usp=sharing
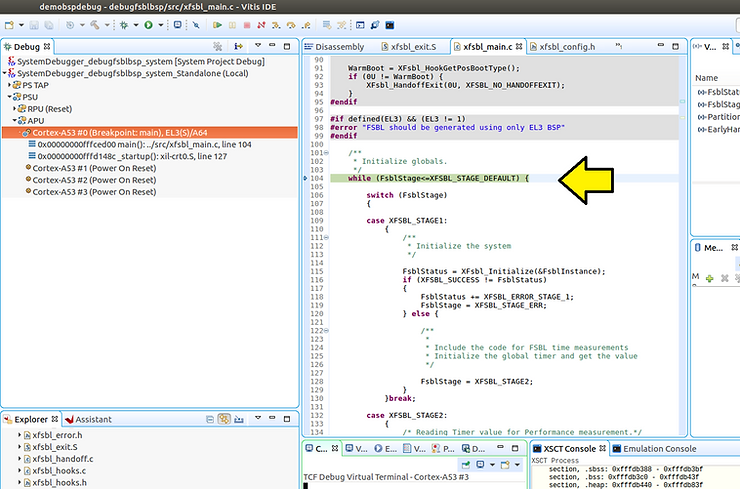
(A) Open xfsbl_ddr_init.c
(B) Go to 6627:
ConfigIic = XIicPs_LookupConfig(XPAR_PSU_I2C_1_DEVICE_ID);
(C) Double-click to set a breakpoint
(D) Click debug
(E) When it hits:
while (FsblStage<=XFSBL_STAGE_DEFAULT) {
…click Resume
(F) When it hits:
Status = XFsbl_IicReadSpdEeprom(SpdData);
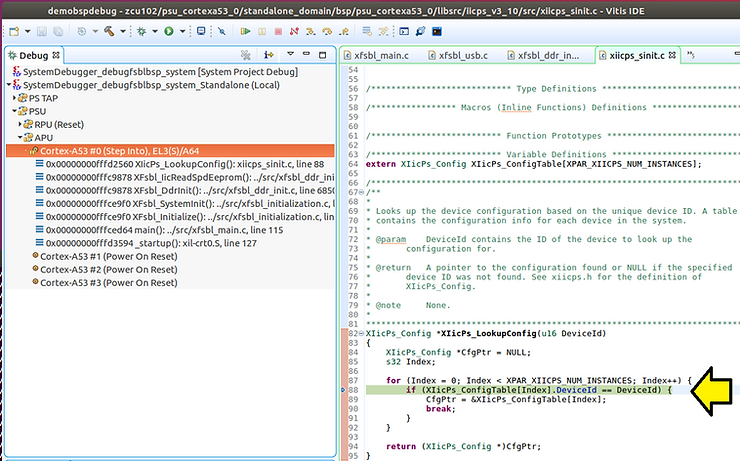
…click Step Into
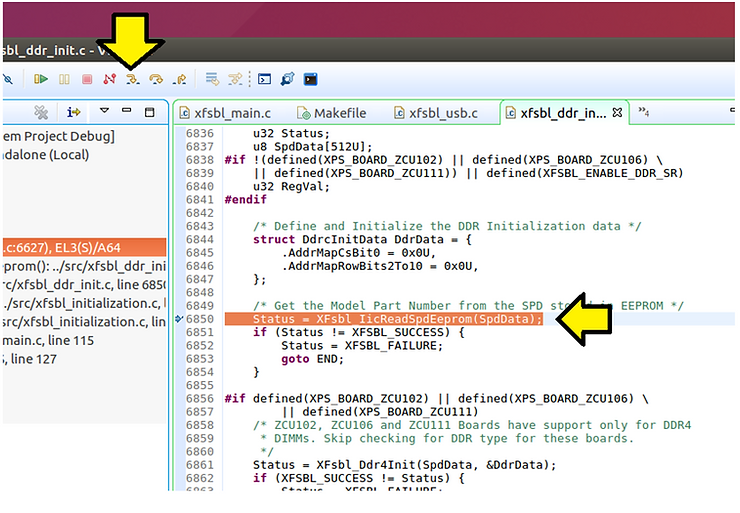
You should see the source code inside the BSP:
References
-
Vitis 2019.2 - Embedded Software Development - Design Hub https://www.xilinx.com/support/documentation-navigation/design-hubs/2019-2/dh0089-vitis-embedded.html
-
Zynq UltraScale+ FSBL Wiki https://xilinx-wiki.atlassian.net/wiki/spaces/A/pages/18842019/Zynq+UltraScale+FSBL
-
Vitis Unified Software Platform Documentation Embedded Software Development UG1400 (v2019.2) March 18, 2020 https://www.xilinx.com/support/documentation/sw_manuals/xilinx2019_2/ug1400-vitis-embedded.pdf
-
Vitis Unified Software Platform Documentation Application Acceleration Development UG1393 (v2019.2) February 28, 2020 https://www.xilinx.com/support/documentation/sw_manuals/xilinx2019_2/ug1393-vitis-application-acceleration.pdf
-
Xilinx logo clipped from xilinx.com