.png)

GCP IoT Core Quickstart Run-Through
- Zach Pfeffer

- Dec 13, 2018
- 2 min read
Updated: May 14, 2023
This post presents a run-through of the Google Cloud Platform (GCP) Internet of Things (IoT) Core Quickstart at [link].
Before you begin
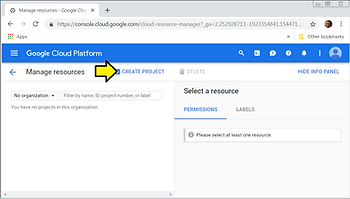
1. In the GCP Console, go to the Manage resources page and select or create a new project.
1. Go to the Manage Resources page at [link]
2. Log in with google.cloud@centennialsoftwaresolutions.com
3. Click CREATE PROJECT
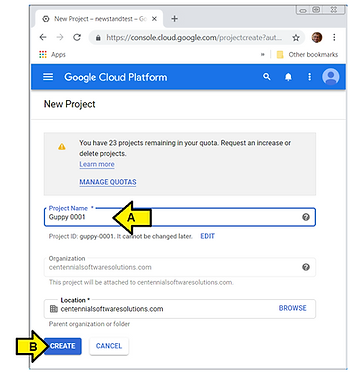
4. (A) Name the project Guppy 0001 and (B) click CREATE
I see:

...(A) click the pull-down to (B) select my project: Guppy 0001.

... to see the dashboard:

2. Make sure that billing is enabled for your project.
1. Read the steps posted at [link]
2. Select Billing

I see my billing dashboard:

3. Enable the Cloud IoT Core and Cloud Pub/Sub APIs.
1. Make sure google.cloud@centennialsoftwaresolutions.com is selected:

2. (A) With Guppy 0001 selected, scroll down and (B) click IoT Core under BIG DATA

3. Click Enable API

4. Click Create a device registry

5. After reviewing Device registries at [link] and Permitted characters and size requirements at [link]
Use:
Registry ID: test-reg.0
Region: us-central1
Both MQTT and HTTP protocols
Default telemetry topic: test-topic.0
And Debug level debugging

...and click Create

I see:

Generate a device key pair
Open a terminal window and run the following multi-line command to create an RS256 key:
1. (A) Click to launch a Google Cloud Shell Environment shell, (B) paste command above to create a key

2. Type ls in the shell to see the files with the keys:

3. Save the keys
(A) Click the 3 vertical dots icon, the (B) click Download file

...enter: /home/google_cloud/rsa_cert.pem and click DOWNLOAD

...click Save

...do the same thing for: /home/google_cloud/rsa_private.pem
Add a device to the registry
1. Click Create device

2. Enter my-device for the Device ID

3. Click the Allow radio button under Device communication

4. Select the RS256_X509 radio button under Public key format

5. Type cat rsa_cert.pem in the Google Cloud Shell

6. (A) Use you mouse to select the key (it will be copied), (B) then click the Public key value box and (C) press Ctrl-v (to paste).

7. Leave Public key expiration data unset

8. Leave Device metadata blank

9. Click Debug level Stackdriver Logging

10. Click Create

Continuing from Google Cloud Internet of Things Core: Using the MQTT Bridge at [link]
MQTT server
The Cloud IoT Core service supports the MQTT protocol by running a managed broker that listens to the port mqtt.googleapis.com:8883. Port 8883 is the standard TCP port reserved with IANA for secure MQTT connections. Connections to this port must use TLS transport, which is supported by open source clients like Eclipse Paho.
If port 8883 is blocked by your firewall, you can also use port 443: mqtt.googleapis.com:443.
Device authentication
When the MQTT client connects, it must specify the device by setting the MQTT client ID to the full device path:
projects/{project-id}/locations/{cloud-region}/registries/{registry-id}/devices/{device-id}
In this case:
projects/{project-id}/locations/{cloud-region}/registries/{registry-id}/devices/{device-id}
project-id: guppy-0001
cloud-region: us-central1
registry-id: test-reg.0
device-id: my-device
projects/guppy-0001/locations/us-central1/registries/test-reg.0/devices/my-device
...and the device state topic is:
projects/guppy-0001/topics/test-topic.0
Continuing from Google Cloud Internet of Things Core: Using JSON Web Tokens (JWTs) [link]
References
Google Cloud logo found with a Google image search, image from [link]